

Sending Custom Data Between Pages Doesn’t Need to be a Challenge
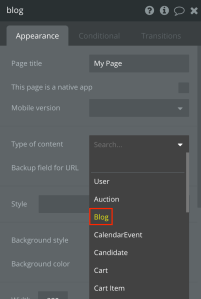
As you develop your Bubble.io no code web apps you’ll eventually find a page or two in your design that has a custom data type such as “Blog”, “Newsletter”, “Vehicle”, “Class”, etc. Below is an example of a Bubble.io page where Type of content is “Blog” (Blog is a custom data type created in Data tab.)
Setting up your page with a custom data type will make your page design easier because Bubble.io will automatically have the elements and workflows setup to deal with that data type. Additionally you will be able send your users custom links which will bring them directly to the page and show specific content pulled directly from your app’s database.
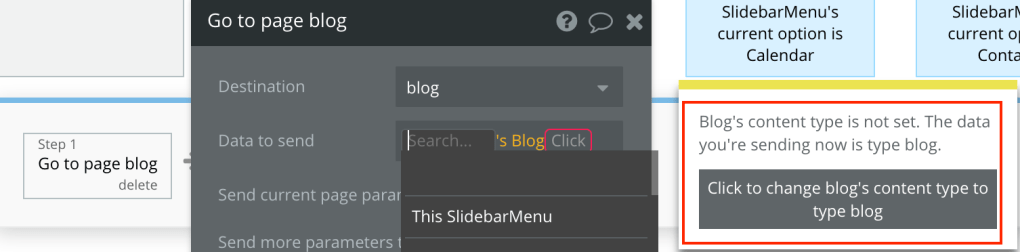
However, navigating between pages (go to page) which have different data types in Bubble.io is not straightforward because Bubble.io is expecting you to send the correct data type to the page. So if you’re on your Index page (typically with a blank or “User” data type) and you navigate to your “Blog” page (which has “Blog” data type), “out of the box” Bubble.io will be expecting the same data type to be sent. If the two pages don’t have the same data type you’ll get a message similar to below.
Fortunately there are a couple of ways to solve this issue.
Solution Example #1 – Use Custom States
Let’s assume you’re using the SlidebarMenu to navigate between pages in your Bubble.io web app. There are two solutions in which you can setup a Workflow to go from one page with one Data Type (ie “user”) to a second page with a different Data Type (ie “blog”).
NOTE: Check out https://echolaketech.com/2018/11/19/using-the-slidebar-menu-in-your-bubble-app/ to learn how to setup the SlidebarMenu in your Bubble.io no code web app
In this first solution a Custom State is used in the “Go to page blog” Workflow step. In this example, “Data to send” field contains the Custom State “index’s Blog”
NOTE: Check out https://echolaketech.com/2018/10/10/how-to-add-custom-states-to-your-bubble-app/ to learn on how to setup custom states in your Bubble.io no code web app

The Custom State “Blog” has a Data Type “Blog”. Using the “Blog” Custom State in the “Go to page blog” Workflow step will tell your Bubble.io web app to send “Blog” data to the “Blog” page. So if the Data Type of the originating page isn’t the same as the destination page (ie going from a page with “User” data to a page with “Blog” data), setting up a Custom State similar to this Blog example will let you use the “Go to page” step and send the right data.

Solution Example #2 – Use a Search
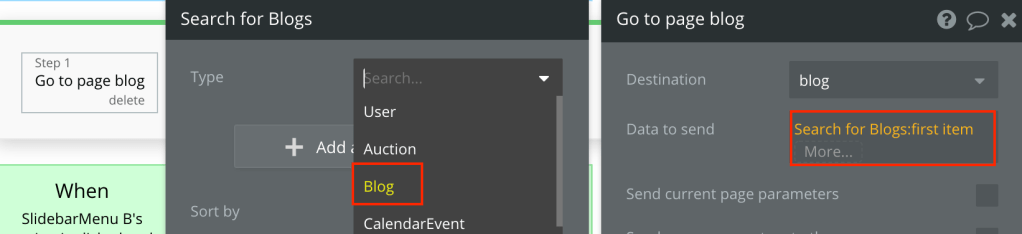
In the second solution a Search is used instead of a Custom State in the “Go to page blog” Workflow step. To assign the correct data to send in this step you’ll do a “Search for Blogs:first item” (right side of image) and then select Type to be “Blog” (left side of image). In your app you would select the relevant data type option that matches the same data type as the destination page. Note you’ll need to include “:first item” since the Search is looking for a list of things and you’re only sending one set of data to the receiving page (“Blog” data in this example).
Closing Thoughts Including Trade-offs
While there were two different solutions on how to send a type of data to a receiving page there are some thoughts on trade-offs between the two.
When using the solution based on Custom States, note you’ll need to create a unique Custom State for every page that you have a SlidebarMenu and the Data Type of the originating page is different than the destination page.
But with the solution based on a step using Search, you can copy/paste (re-use) the Workflow on any page since the Search action can be used on any page in your Bubble.io web app. However, even though you can re-use the Workflow there is a slight performance penalty to use a Search. Most likely you won’t notice the performance impact but you should be aware.
Check Out The Video!
For an even more detailed overview on how to implement either of these solutions, check out the video.


