

Simplify Onboarding Process for Your New Users!
There are use cases where you’ll need to create a User account for someone else in your Bubble.io no code web app. For instance, as part of the User onboarding process you may need them to answer pre-screening questions before their account can be approved and created. Or you may have a business to business (“B2B”) type of account where the Users are Employees and accounts need to be setup on their behalf. You get the idea.
Bubble.io provides all the capabilities you need to create a User account on behalf of someone else, including a temporary password. And you can create a Workflow to force the User to change their temporary password before they can login. These are very powerful capabilities you can implement in your Bubble.io no code web app. Let’s walk through a high-level overview on how this is implemented.
NOTE: At the bottom of this post you’ll find the link to the how-to video as well as information on how to get FREE access to the Bubble.io design.
Workflow to Create a User Account for Someone Else in Your Bubble.io No Code Web App
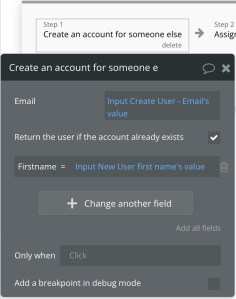
STEP 1: The first Step in the Workflow is to create a new account for someone else. In the image below you’ll see the “Email” field is required as Bubble.io uses an email address as a User’s login Username. You’ll also see in the image this Step has a field to capture the User’s “Firstname”. While this example is simple for your design implementation you may want to capture more information on the User such as their last name, mobile phone number, address, etc. Additionally, for a B2B type of app you may also want to capture what type of role the User has, ie Engineering, Accounting, Sales, etc. Just make sure you have your Data Structure setup correctly.
STEP 2: Next is Step 2 where you assign a temporary password to the User that was created in Step 1. Note you need to create an Account first (Step 1) before you can assign a temporary password to it.

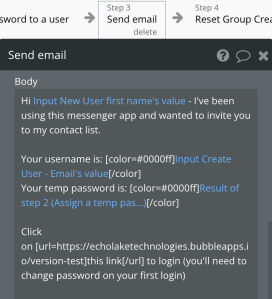
STEP 3: Now that you have created a User and a temporary password you can simply email the user with a link to your Bubble.io no code web app and include important information such as their Username (their email) and temporary password. In the “Send email” Step below is an example of what the email Body content may look like (your content will look different to meet your needs). Note the Username is an Input Element with an email value and the password is a result of the temporary password created in Step 2.
For your Bubble.io web app you may have more information but the “Send email” Step will still be used. Additionally there’s a sentence telling the User to click a link for logging in. In this example the link is for the Index page
Those are the three Steps needed to Create a User with a temporary password and then email them with information on how to login. Now let us take a look at the login page.
Login Page Example
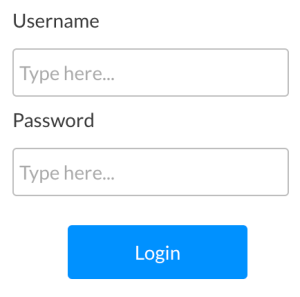
Once the User clicks on the link from the email the page you have designated (“Index” page in this example) will open with a login prompt. Below is a basic example. Your login screen will likely look different based on your app’s design needs.
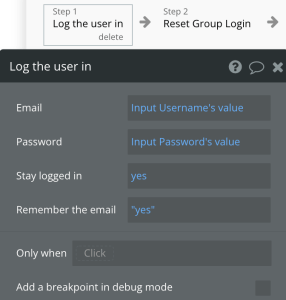
STEP 1: Once the “Login” Button Element is pressed a Workflow will start with the first Step to Log the user in. At this point the User is logged into your Bubble.io web app. However you need to a way to force the User to set a new password if this is their first time logging in.
NOTE: This example is forcing users to change their temporary password on their first login. You may not require this in your design. If not simply don’t implement Step 3.
STEP 3: To set a new password there needs to be a Step to see if the User has logged in before. In the image below for Step 3 you see “Current User’s First login is “yes”” which looks at the Bubble.io database for that User’s “First login” value. If the value is “yes” then a Popup will “Show” (open).
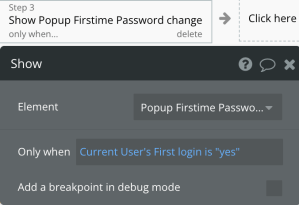
In the database a Data Field called “First login” (“yes/no” field type) was created with a default value of “yes”. This means whenever a User is created in your Bubble.io web app the value “yes” will be assigned automatically to “First login” (a nice data initialization feature from Bubble.io)

Since the “First login” value is “yes” a Popup opens requesting the User to set a new password.
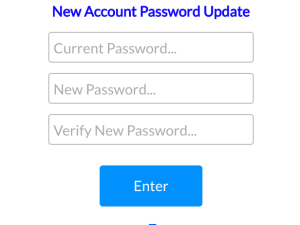
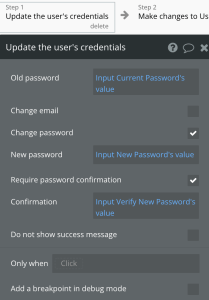
When the User enters their existing password and a new password they will press the “Enter” Button which starts a Workflow to Update the user’s credentials. The credential in this instance being “Password” (see checked box in image below). Note you would also use this Step for changing a User’s email (username) too.
Now that the User’s Password has been updated you need to make a change to the “First login” data field of the User. Reason being – since the temporary password has been replaced with a new password the value of the “First login” field in the database for the user needs to be changed from “yes” to “no”
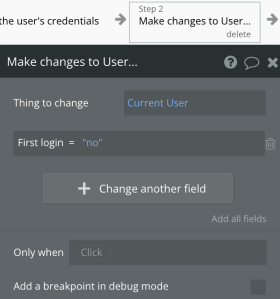
By making this change in the database the next time the User logs in they will not be greeted with a Popup asking them to change their password.
Summary
As you can see creating a new User on behalf of other people, assigning a temporary password and emailing them a link to login is fairly straightforward to implement in your Bubble.io no code web app. While this was a basic overview of the design you can develop a more elaborate onboarding process for your particular design needs.
Check Out The How To Video!
For an even more detailed overview on how to create new Users in your Bubble.io no code web app, check out the video below. Also scroll down and see how to get FREE access to the Bubble.io design


