

Making a Cell Disappear in a Snap (or Click!)
You’re probably already familiar with using a Repeating Group (“RG”) to show a list of things in your Bubble.io no code web app. If not, check out https://echolaketech.com/2021/01/02/how-to-handle-a-list-of-things-using-repeating-groups-in-your-bubble-io-no-code-web-app/
Typically you manage what data is shown in the RG by adding constraints to the Data Source Search. However there is a way to simply hide any cell in a RG without the need to do a search or any additional search constraints. To do so you will add a Group Element in the primary (first) RG cell. Let’s walk thru it.
Step #1 – Adding a Group to the First Repeating Group Cell
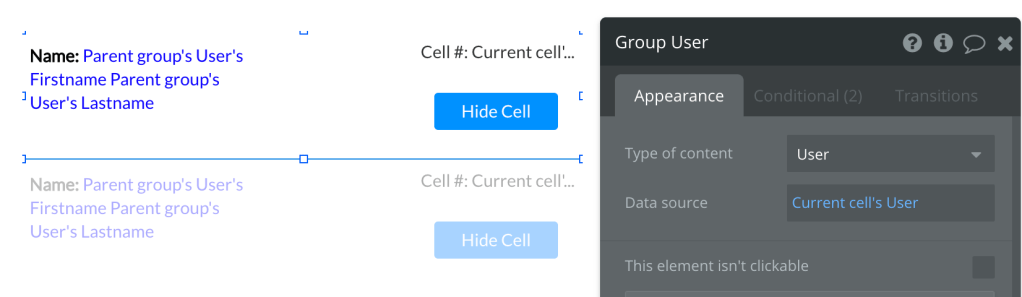
Once you have your RG added in your Bubble.io design you’ll need to put a Group Element in the first cell (NOTE: the first Cell in a RG determines all of the Elements in every RG Cell – it’s the only Cell you can edit). Make the Group the same size as the Cell’s height and width. Reason being – when you want to hide a RG Cell, you’re actually hiding the Group in that Cell (so make the Group the same size as the Cell)
Two other things are important when setting up the Group:
- Make sure your Group’s Data source is the same as the Repeating Group (ie “Current cell’s User” above)
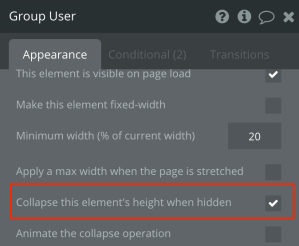
- Make sure you select the collapse Group’s height option (see image below)
Step #2 – Setup Conditionals Using Custom States to Track Hidden Cells
Now that you have a Group in the first RG Cell you need to add two conditionals, one to hide the Group and one to make it visible (refer to image below).
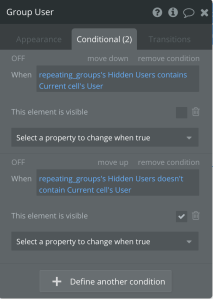
There is one Custom State called “Hidden Users” used in the Conditional to show or hide the Group. If you’re not familiar with setting up Custom States, check out https://echolaketech.com/2018/10/10/how-to-add-custom-states-to-your-bubble-app/ or watch the video at the bottom of this post.
The “Hidden Users” Custom State is used to track all the Users who should not be visible in the RG. This means the corresponding RG Cell will be hidden for any specific User in the “Hidden Users” list. Note in the image below that “Hidden Users” is of type User and “List” is checked off because the Custom State is keeping a list of Users (not just one User).

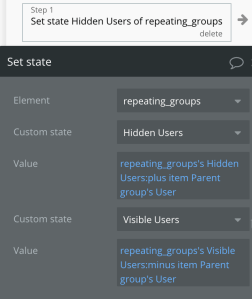
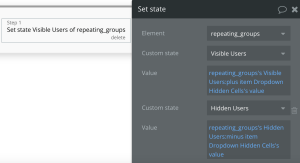
Step #3 – Workflow to Hide a Cell
In the demo is a Button which when pushed starts a simple Workflow with only one Step to Set State for the Custom States. Below you see Workflow Step where there are two Custom States – “Hidden Users” mentioned earlier and “Visible Users”. Reason for both which you probably already guessed – one to keep track of all the hidden Users (or hidden Cells) and one to keep track of all the visible Users (or visible Cells)
Step #4 – Workflow to Un-Hide a Cell
Now that you have seen how to hide Cells, let’s look at the Workflow to un-hide a Cell. In this example a Dropdown Element was used to show all of the Users (Cells) that are hidden.
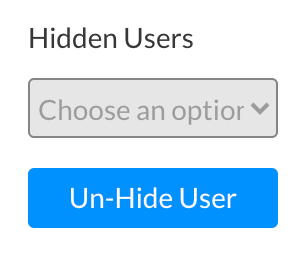
To start the Workflow to unhide any Cell (User) a Button was used. Once the button is pushed the following single-step Workflow runs. Similar to the Workflow to hide a Cell, the “Set state” Step is used to change the “Hidden Users” Custom State by removing (“:minus item”) the Dropdown’s value. And for the Repeating Group to show the Cell, the “Visible Users” Custom State needs to add (“:plus item”) the Dropdown’s value.
Check Out The How To Video!
For an even more detailed overview on how to implement hidden Repeating Group Cells in your Bubble.io no code web app, check out the video.


