

Customize Your App’s URL’s To Make Them More Personalized and Meaningful to Your Users
Most likely you have seen a page link in your Bubble.io no code web app that has a cryptic extension similar to the following:
https://echolaketechnologies.bubbleapps.io/version-test/blog/1617065713379×833851008010420200

If you’re like most people you would like to share links with your customers. Using blog entries as an example, you probably have a mailing list and would want to send the link of your latest blog to your list. But wouldn’t it be nice to send a custom link that was descriptive and didn’t use the cryptic extension, something like this:
https://echolaketechnologies.bubbleapps.io/version-test/blog/customize-your-pagelinks
Three Steps to Create Custom Page Links in Your Bubble.io No Code Web App
Step 1 – Create the Thing
The first step is to add the workflow step to create a new thing. In this example the thing being created is a Blog post with only two data fields, “Blog Content” and “Blog Title”

Step 2 – Create the Slug
The second step is create the slug for the Blog post from the first step. This is done by using selecting Data (Things) and then choosing “Set a thing’s slug…”

Once you’ve selected that step action you’ll need to pick “Results of step 1 (Create a new Blog…)” as the “Thing to change”. This basically tells Bubble that you want to make a change to the Blog post created in Step 1.
Now the important part is to assign the value to the Blog post’s “Slug”. In this example an input field called “Blog Title” was used so a User can type in the value for the slug.
This input will be used as the custom extension in the page’s link – the slug

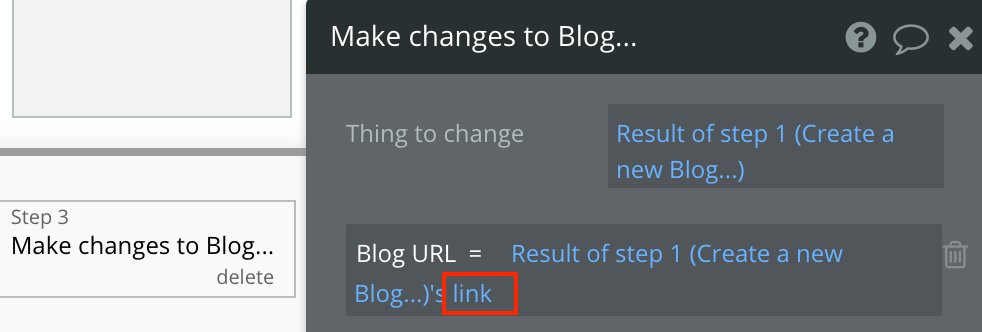
Step 3 – Create the Blog Post URL with the Slug Extension
In the final step you’ll create the Blog post’s URL which will include the slug extension you created in Step 2. Simply add the “Make changes to Blog…” step. Similar to Step 2, the “Thing to change” is Blog post created in Step 1.
The data field “Blog URL” also uses the Result from Step 1 but make sure you add “link” at the end.
Wrapping It Up and Next Steps
Bubble.io has made it fairly easy to create your own customized Slugs which you can add to the URL of Things you’re creating in your Bubble.io no code web app. This allows you to add description links to your web app’s. You an also send these descriptive links to your mailing list which is a nice feature vs sending the cryptic unique ID as part of the link.
Check out this video to get a detailed how-to information to help you set up a slug in your Bubble.io no code web app.


