

4 Ways You Can Use A Dropdown Menu – Which One is Optimal for Your Design?
Chances are you’re using a Dropdown Element in your Bubble.io no code web app because they’re a great way for Users to select an item from a list or menu of choices. But did you know there are 4 ways you can implement the Dropdown Element?
And depending on your Bubble.io no code web app’s design, you may not be using the right implementation that’s best for your web app.
Let’s explore the four ways so you can decide which implementation is best for you!
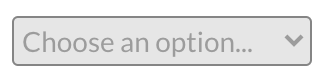
#1 – Dropdown with Static Choices (Easiest)
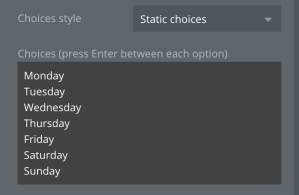
Setting up a Dropdown Element to use Static choices is probably the easiest one to implement because as the name implies, once the values in the Dropdown are determined you probably won’t be changing them again.

When to Use Good examples for when you want to use Static choices are days of week, months of the year, states/territories/countries, etc.
#2 – Dropdown with Dynamic Choices Using A Database Search (Most Flexible)
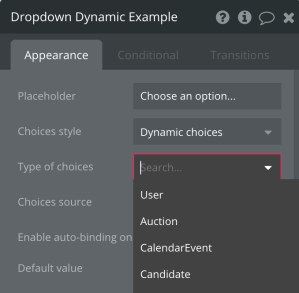
You can set up a Dropdown Element to use Dynamic choices in three different ways. This section will cover the most flexible way – using a Search for command to pull data from your Bubble.io no code web app’s database.
For Type of choices you’ll need to make a selection from your list of Data Types – in this example “Day of Week” was chosen.
Once you have your Type of choices selected you’ll need to setup Choices source. In this Dropdown scenario Search for is used and then “Day of Week” selected. In your design you’ll be choosing a different Data Type and do a search for that. Lastly under Option caption Bubble.io will give you Current option’s and then you’ll choose the Data Field – in this example it’s “Day”
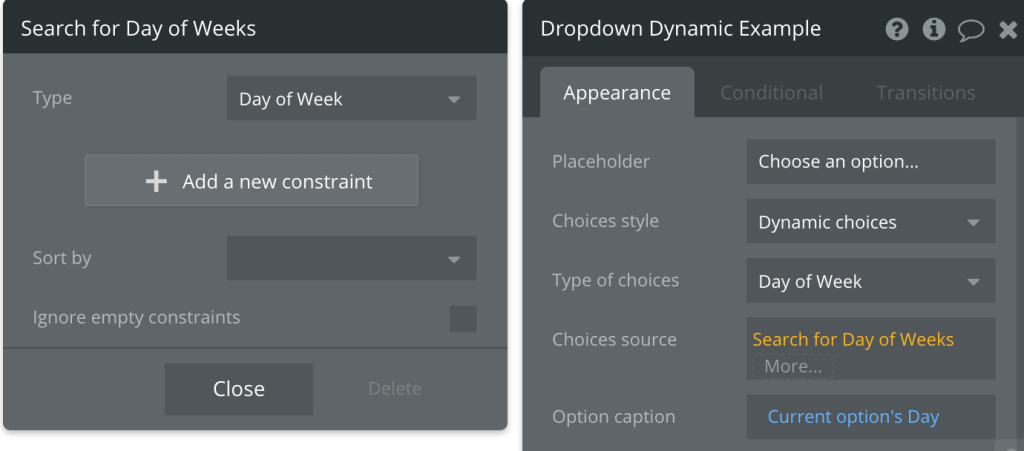
Just a quick note on the Data Structure. “Day of Week” is a Data Type that was created in the Bubble.io database and has 7 instances, one for each day of the week (Monday thru Sunday).

When to Use A good example for when you want to use Dynamic choices with the Search for command is when your Data Type will change over time. For instance you may have a list of items for sale, list of users, list of customer accounts, etc which will change over time. Static choices isn’t a good choice because you’ll regularly be updating the list in the Dropdown manually. But using the Dynamic choices with a Search for allows your app do all the work for you – automatically.
Additionally you can add Constraints to the Search for (Add a new constraint). So if you have a list of users or customers in your Bubble.io no code web app you can add a Constraint to specify a particular type of user or customer, ie a “regular” user vs a “premium” user or “teachers” vs “students.
NOTE: While this approach is the most flexible in terms of what choices you can automatically add in the Dropdown choices, you need to be aware of a side-effect. This implementation requires a database search which effects performance in your no code web app. So when you’re looking to implement a Dropdown, keep this in mind and make sure this implementation is the right one vs one of the other three choices.
#3 – Dropdown with Dynamic Choices Using Option Sets
The third way for you to set up a Dropdown Element using Dynamic choices is with Option Sets. First you’ll need to create an Option Set which starts over in the Option sets tab under Data. Use the New option set to create the Option set – “Days Of Week” was created in this example.
Once created, you’ll need to create attributes using the Create a new attribute button. Display is a standard attribute provided by Bubble.io and “Picture” (of Data Type Image)was created for this design. Display is the name that will show up in the Dropdown list and is linked to the Options discussed next.
The next step in setting up the Option sets is to create the Options by entering the name in New option input. These list of Options are what will show up in the Dropdown.
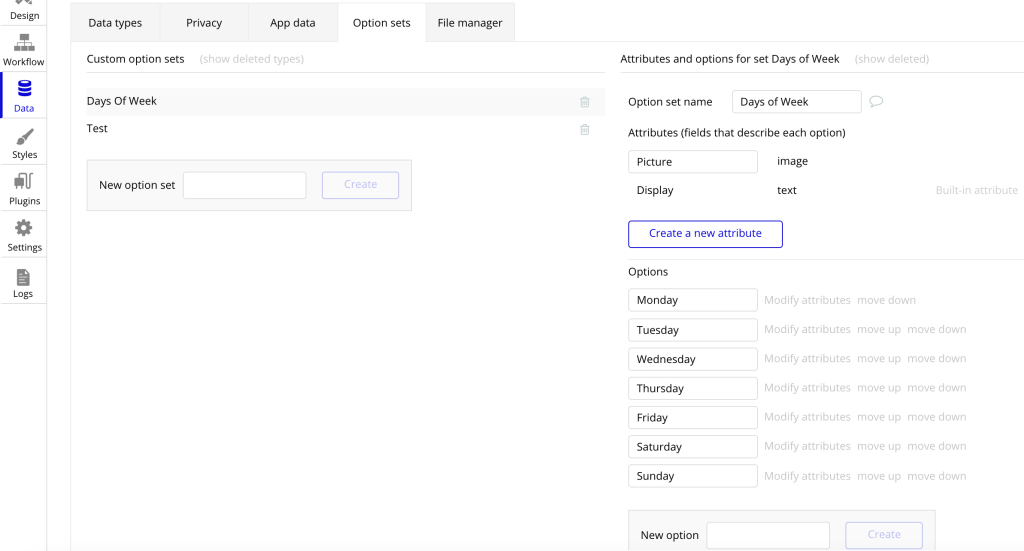
The final step is to add values to the Attributes for each Option Set’s Option. By clicking Modify attributes you’ll get a popup in which you will enter the attribute values. In this design there are two Attributes – “Display” (provided by Bubble.io) and “Picture” which was created for this example.

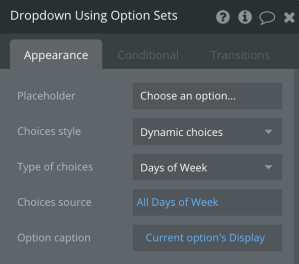
Now that the Option Set is created you can use it in a Dropdown Element. The Types of choices will be the Option Set (“Days of Week”). Then select the Choices source with the Option Set “All Days of Week” (Bubble.io adds “All”). Lastly you need to choose the Option caption in which Bubble.io provides Current option’s. In this example (and likely in your implementation) you select Display.
When to Use A good example for when you use an Option Set in a Dropdown is when you know there will be a finite items in the list like days of week or months in the Static Dropdown example. However, you will most likely want to add Attributes to that list (otherwise use the Static Dropdown). And as you saw above, Option Sets allow you to have multiple Attributes for each Option, ie “Pictures” shown above. The advantage of the Option Set is Bubble.io isn’t doing a database search to pull the Attribute data which is good for your no code web app’s performance. You can think of a Dropdown using Option Sets almost as a combination of a Static Dropdown and a Dynamic Dropdown using Search but without the performance hit.
NOTE: To change the list used in a Dropdown using Option Sets you will need to manually go in and update the Options (analogous to updating Static Dropdown). And in making a change to the Option Set your no code web app will need to be refreshed.
Also note that when your Option Set is setup you can use it throughout your Bubble.io no code web app (analogous to using a Data Type) which is a nice feature.
#4 – Dropdown with Dynamic Choices Using Data Structure – The “Best” Approach?
The fourth way for you to set up a Dropdown Element using Dynamic choices is by using your Data Structure. Earlier in the post you saw “Day of Week” Data Type with the 7 days. The next step is to add that Data Type as a List to another Data Type – “User” in this design. If you think of the Data Structure from a “parent/child” relationship, “User” is the “parent” and “Day of Week” is a “child“. And since there are 7 days in a week (ie a list of days) you need to setup “Day of Week” as “List of Day of Weeks”

As a different example instead of using “User”, let’s say you have a Bubble.io no code web app that’s a marketplace for multiple users. Your Bubble.io no code web app may have a Data Type called “Store” because there are multiple Stores supported in your marketplace app. Then you may have a Data Type called “Merchandise” for each product sold. In “Store” you would have a Data Field called “Items for Sale” which would be of Type “Merchandise”, set up as a List. This is equivalent to having “User” with “Days of Week” setup as a List.
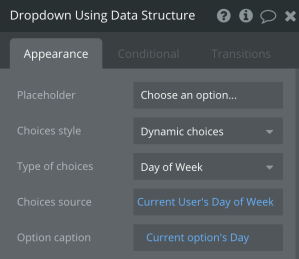
To setup up the Dropdown using the Data Structure you simply choose “Day of Week” Data Type as the Type of choices. For Choices source you choose “Current User’s Day of Week” (“Current User” is chosen since Day of Week is a “child” to it). Back to the marketplace example, you would have “Store” as Type of choices and “Current Store’s Merchandise” would be the Choices source. Similar to the earlier dynamic examples, Option caption would be “Current options Day”.
When to Use Using a Data Structure approach in a Dropdown is probably the best implementation to use of the three dynamic choices. Similar to Option Sets, setting up your Dropdown using this approach will be higher performance. You can also have multiple Data Fields available. As with Option Sets, the Data Structure allows you to access the data anywhere in your design. And when you make a change to the data in the Bubble.io database you don’t need to refresh you app as you do with Option Sets.
The important thing for you to do is think through what type of data will be created in your Bubble.io no code web app, what is the relationship between the different data and how will your Users use or interact with the data.
For instance, having “Merchandise” as a “child” to “User” in your Data Structure probably doesn’t make as much sense as it does if it were a “child” with “Store”. A User will likely want “Store” data first (ie pick a Store to buy from) before picking “Merchandise”. So having “Merchandise” as a “child” to “Store” makes more sense.
Check out the YouTube Video for More Details
As you can see there are multiple ways for getting data into your Dropdown Element, each with pros and cons. For more details on how to setup any of these four Dropdown scenarios check out the how-to tutorial video.
And please subscribe… Thanks in advance!


