

Chances are your Bubble.io no code web app has multiple user types and, depending on the user type, you want your app to direct a User to a particular page. For instance, let’s imagine an education app that’s used by Students and Teachers. In this app, you would have two user types, “Student” and “Teacher”.
When either the Student or Teacher creates an account to login, you’ll want to direct them to their corresponding “Student” or “Teacher” page. This way they’ll only see content that’s relevant to their needs.
Watch the video below to learn how you can setup different User types in your Bubble.io no code web app.
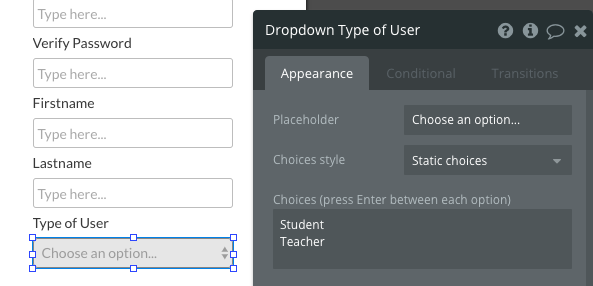
Setting up your app to support multiple User types requires a Data Field under User Type. In the video the Field Name is called “Type of User” and is of Field Type “text”.
For the design of User account creation, using a Dropdown Element is a good input choice for Type of User. The Dropdown’s “Choices style” should be setup as “Static choices” and you’ll need to type in the Choices. Careful with spelling and capitalization. In the image below, the choices are “Student” and “Teacher”. Using the Dropdown instead of an Input Element is better as it will eliminate the potential of User misspellings.
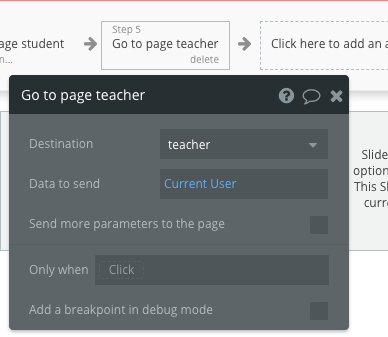
You’ll need to add two Workflow Steps, one for “Student” Users and the second for “Teacher” Users. In the image below, the Step will navigate the User to the “student” page if the Type of User is “Student”. Note the “Only when” criteria. This is important to add so your app will know to go to the “student” page only if the User is a “Student”

This next image is similar in that it will navigate the User to “teacher” when the Type of User is “Teacher”. Note there is no “Only when” condition. The reason being – it’s the last Step in the Workflow. If the Workflow makes it that far, then that means it skipped the prior Step (go to “student” page because the User isn’t a “Student”).
Check out the video for more details on how to setup your app so you too can have multiple User types in your app.


1 thought on “Create Different User Types for Your Bubble.io No Code Web App”