

Learn How to Save Time Using Custom State Data with a Checkbox in Your Bubble.io App
In a this blog post and video you saw how adding Custom States to your Bubble.io no code web app can be more efficient in showing or hiding things like Groups or Buttons. Let’s continue on and see how Custom States can also be used to add data to your database. Watch the video below to see in greater detail exactly how to add Custom States to Checkboxes.
A Checkbox Element was implemented a few different ways in the design so you can see there are some trade-offs in Workflow design. You’ll also see a peculiar behavior in Bubble.io when you have a Workflow that detects input changes (ie when the Checkbox gets clicked). In that scenario, if your User clicks on the Checkbox quickly and repeatedly, the “state” of the Checkbox (true/yes or false/no) will get out of sync with what’s in the no code app’s database. To fix the issue, you will see how to implement a Custom State and pass data (true/yes or false/no) to the database in a reliable manner. Note that while I demonstrate this peculiar behavior using a Checkbox, if your app has Workflows that start when an Element’s input value has changed (ie Radio button, Ionic toggle, etc), you’ll want to implement Custom States.
Implementation #1 – No Custom States
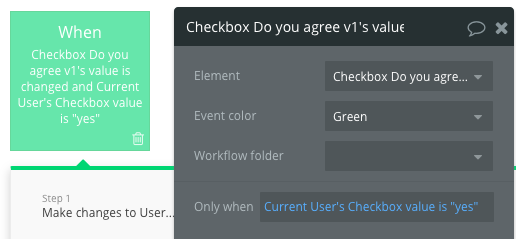
The images below show the Event Workflow for when the Checkbox input changes (toggles) and the “state” of the Checkbox (true/yes or false/no) is written to the database. This Event’s Workflow will start when the Checkbox’s value is “yes”; then the Workflow will flip the “Checkbox value” in the database to “no”. There is another Event to change the “no” to “yes” (not shown in this blog); the video shows you in more detail. Note also that writing to the database every time the Checkbox is toggled does have a performance impact. Reason being is Bubble.io will write the value from your app running in the browser (the Client) across the Internet to the database (the Server) every time the value changes. That takes time which impacts performance and user experience.
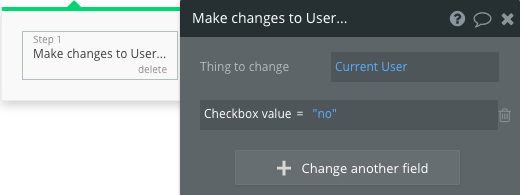
The next image shows the Workflow step to write “no” to “Checkbox value” in the database
Implementation #2 – Using Custom States
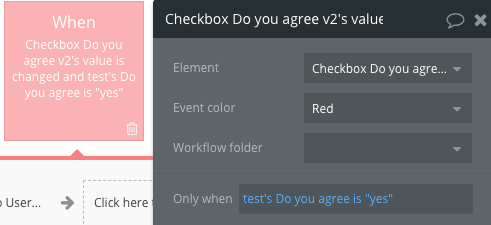
The images below show the Checkbox implementation using Custom States starting with the Event for when a Checkbox input changes. Note the “Only when” criteria in the image is for when the Custom State “Do you agree” is “yes”. There’s another Event with a criteria when “Do you agree” is “no” (not shown in the blog but can be seen in the video)
The first Workflow step changes the Custom State “Do you agree” value to “no”
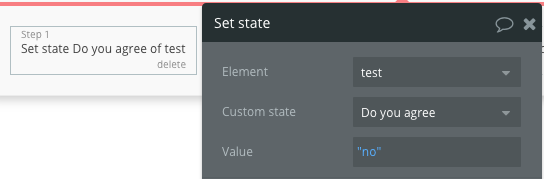
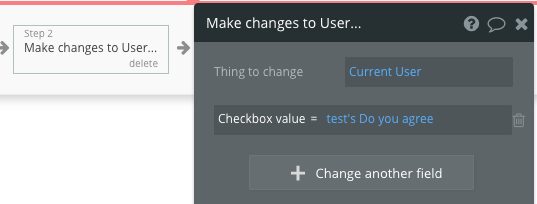
The second Workflow step writes the Custom State “Do you agree” value of “no” to “Checkbox value” in the database
Final Comments on Checkbox and Custom States
Recall the earlier comments about performance issues when writing to the database. When you use Custom States, you’re changing the value of the Custom State locally on the Client (ie your laptop, smartphone, etc). So you can continue changing the value of the Checkbox without a performance hit since you’re not writing data to the database. Here’s an important note: When you use Custom States, aside from the default value you initialize the Custom State with, the values are not “persistent” meaning when your browser refreshes, the Custom State will go back to it’s default value. For instance, the Custom States in the Checkbox example have a default value of “False”. If you click the Checkbox, the Custom State value will change to “True”. If your browser refreshes, when your app comes up again, the Custom State value will be back to “False”. Be aware of this behavior when using Custom States.
As you can from this video and the prior blog/video, Custom States are a powerful tool for you to use in your Bubble “toolbox”. Adding a Checkbox also gives you a nice capability to allow your users a quick way to choose areas of interest or a selection of user characteristics. Using Custom States together with a Checkbox can provide your users with a positive experience and is a nice capability for you to design in.


